Building a Barcode Scanner App for Android
Welcome! In this guide, we’ll explore the exciting journey of creating a functional barcode scanner application for Android devices. Imagine an app that not only quickly scans product barcodes but also allows you to manage and interact with a substantial inventory of items – perhaps around 1500!
Developing such an application involves several key steps, from setting up your development environment and integrating barcode scanning capabilities to efficiently handling a large local database of products. Whether you’re looking to streamline inventory management for a small business, organize your personal collection, or just explore mobile app development, this project offers a fantastic opportunity to learn and apply practical skills.
We’ll cover the fundamental concepts and tools you’ll need to transform your idea into a working Android application that can scan, identify, and display information about a vast array of items. Let’s get started on bringing your barcode scanner app to life!
Creating a barcode scanner app for Android that can manage a large inventory, like 1500 items, involves several key steps, from setting up your development environment to integrating a database and building the user interface. The React Native app I provided earlier demonstrates the core logic and database integration.
[elementor-template id=”1036″]
Here’s a step-by-step guide on how to achieve this:
Also read this blog: How to make an mobile apps
Step 1: Set Up Your Android Development Environment
Before you can build any Android app with React Native, you need to set up your development environment.
Install Node.js and npm (or Yarn): React Native development requires Node.js. Download and install the latest LTS version from the official Node.js website. npm (Node Package Manager) comes with Node.js.
Install the Java Development Kit (JDK): Android development requires Java. Install JDK 11 or newer.
Install Android Studio:
Download and install Android Studio from the official Android Developers website.
During installation, ensure you select to install:
Android SDK
Android SDK Platform-Tools
Android Virtual Device (AVD)
Open Android Studio, go to SDK Manager (Tools > SDK Manager), and make sure you have an Android SDK Platform (e.g., Android 13.0 – Tiramisu) installed. Also, go to SDK Tools tab and install Android SDK Command-line Tools.
Configure Environment Variables:
Set up the ANDROID_HOME environment variable to point to your Android SDK directory (e.g., C:\Users\YourUser\AppData\Local\Android\Sdk on Windows or ~/Library/Android/sdk on macOS).
Add Android platform-tools and tools directories to your system’s PATH.
Step 2: Create a React Native Project
Once your environment is ready, create a new React Native project.
Install the Expo CLI (Recommended for Beginners):
npm install -g expo-cli
(Alternatively, you can use React Native CLI if you prefer more control over native modules, but Expo simplifies many aspects.)
Create a New Project:
expo init BarcodeScannerApp
cd BarcodeScannerApp
Choose the “blank” template when prompted.
Also read this blog: Best Mobile App Features
Step 3: Integrate Firebase Firestore for Data Storage
Your app needs a database to store 1500 items. Firebase Firestore is a NoSQL cloud database that’s perfect for this, offering real-time updates and scalability.
Create a Firebase Project:
Go to the Firebase Console.
Click “Add project” and follow the steps to create a new project.
Add a Web App to Your Firebase Project:
In your Firebase project, click on the web icon (</>) to add a web app.
Follow the instructions and copy your Firebase configuration object. It will look something like this:
const firebaseConfig = {
apiKey: “YOUR_API_KEY”,
authDomain: “YOUR_AUTH_DOMAIN”,
projectId: “YOUR_PROJECT_ID”,
storageBucket: “YOUR_STORAGE_BUCKET”,
messagingSenderId: “YOUR_MESSAGING_SENDER_ID”,
appId: “YOUR_APP_ID”,
measurementId: “YOUR_MEASUREMENT_ID”
};
Install Firebase SDK in your React Native Project:
npm install firebase
Update Your App.js with Firebase Config and Logic:
Replace the content of your App.js file with the React Native code I provided previously.
Crucially, update the firebaseConfig and appId variables in the provided code with the actual values from your Firebase project. The __app_id and __firebase_config variables in the code are placeholders for the environment where the code runs (like this interactive environment). When running locally, you’ll explicitly put your Firebase config here. For __initial_auth_token, you can leave it as null to use anonymous sign-in or use a custom token if you have an advanced authentication setup.
Ensure your Firestore security rules allow authenticated users to read and write to your collection, as per the Firestore rules mentioned in the initial instructions (e.g., /artifacts/{appId}/users/{userId}/items).
[elementor-template id=”1036″]
Step 4: Build the UI and Logic (from the provided code)
The provided React Native code (barcode-scanner-app) contains the complete UI and logic for the barcode scanner and item management.
- State Management: useState hooks manage the input fields (barcode, itemName, itemDescription), the list of items, loading states, error messages, and user authentication (userId, authReady).
- Authentication (useEffect for onAuthStateChanged): The app initializes Firebase Auth and attempts to sign in the user anonymously or with a provided custom token. This ensures that Firestore operations are performed by an authenticated user.
- Data Fetching (useEffect for onSnapshot): After authentication, the app sets up a real-time listener using onSnapshot to fetch items from your Firestore collection. It sorts them by barcode for consistent display. This means any changes in Firestore will automatically reflect in your app.
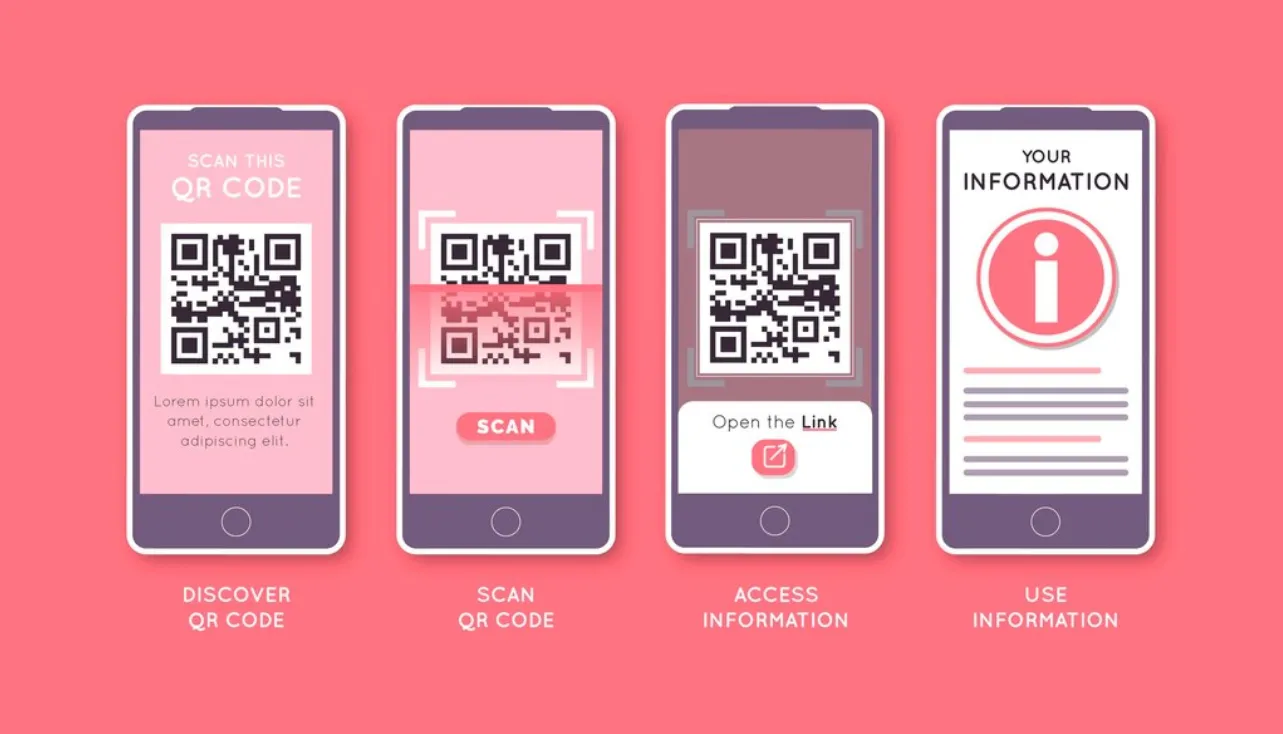
- Simulated Barcode Scan (handleScanBarcode): This function takes the manually entered barcode, queries Firestore for an item with that barcode, and displays the item’s details if found. In a real application, this function would integrate a barcode scanner library (e.g., react-native-camera or expo-barcode-scanner) to use the device’s camera.
- Add/Update Item (handleAddItem): This function allows you to add new items to Firestore or update existing ones based on the barcode. It includes checks to prevent duplicate barcodes.
- Generate Dummy Data (generateDummyData): This powerful function creates 1500 dummy items in your Firestore database. It adds them in batches to manage write operations efficiently and helps you quickly populate your inventory for testing.
Step 5: Fill the Database with 1500 Items
You can use the generateDummyData function provided in the React Native app to populate your Firestore database.
Run the app on an emulator or device (see Step 6).
Click the “Generate Dummy Data (1500 Items)” button within the app’s interface.
Monitor the progress alerts as items are added.
Note on Real-world Data Import: For actual business use, you would typically have existing item data in a spreadsheet (CSV, Excel) or another database. You would then write a separate script (e.g., a Node.js script) to parse that data and upload it to Firestore using the Firebase Admin SDK.
Step 6: Run Your Android App
Start an Android Emulator: In Android Studio, go to Tools > Device Manager and create/start an Android Virtual Device (AVD).
Run the React Native App:
Open your project in your terminal: cd BarcodeScannerApp
Run: npm start or expo start
In the Expo Dev Tools that open in your browser, choose “Run on Android device/emulator.”
Also read this blog insights: Application maintenance and support services
Step 7: Testing and Future Enhancements
Test Barcode Scan: Enter barcodes like BARCODE-0001, BARCODE-0500, etc., to search for items.
Test Add Item: Add new unique items.
Implement Real Barcode Scanning: To turn this into a truly functional barcode scanner, you would integrate a library like expo-barcode-scanner (for Expo projects) or react-native-camera (for bare React Native projects). This would involve:
Installing the library.
Requesting camera permissions.
Rendering a camera view.
Capturing barcode data from the camera and using it to search/add items in Firestore.
Error Handling and UI/UX: Enhance error messages, add loading indicators for all operations, and refine the UI based on user feedback.
Item Deletion/Editing: Add functionality to modify or remove existing items from the inventory.
Search and Filtering: Implement more advanced search capabilities for your item list beyond just exact barcode matches.
Public/Private Data: Consider if some item data should be public (/artifacts/{appId}/public/data/items) for all users to see, or remain private as currently implemented.
This detailed guide should help you get your barcode scanner and inventory management app up and running on Android.
[elementor-template id=”1036″]
Conclusion
This guide provides a comprehensive roadmap for developing a functional barcode scanner and inventory management application for Android using React Native and Firebase Firestore. By following these steps, you can set up your development environment, integrate a scalable cloud database for handling a large volume of items, and implement core functionalities like simulated barcode scanning and item management. Remember that while this guide provides a strong foundation, real-world applications will benefit from integrating actual camera-based scanning and continuous refinement of UI/UX, error handling, and advanced inventory features.